
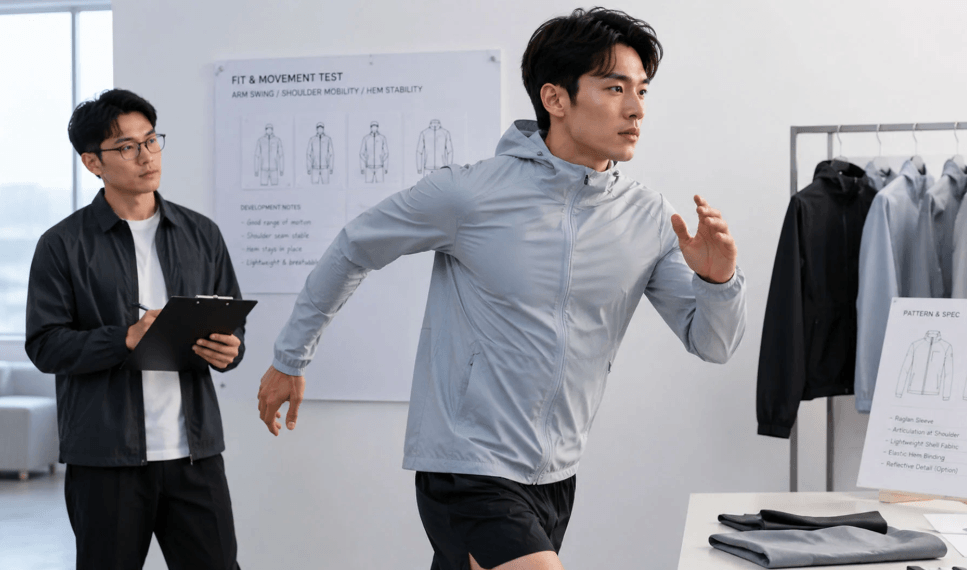
Outerwear Sampling Guide: How Buyers Run Fit and Wear Tests
Most expensive apparel mistakes happen before the order is placed. A jacket looks right in a photograph, the price is attractive, and the quantity is confirmed. Then the delivery arrives, and the sleeves are short, the zip sticks, or the color is not quite what the screen showed. By then it is too late.
A sampling process is the cheapest insurance a buyer has. This guide is for retailers, employers, and organizations who buy outerwear in volume and want a structured way to test garments before committing.
Decide What the Sample Must Prove
Before ordering a single sample, write down what you need to learn. A retailer wants to know whether the garment will sell and whether customers will keep it. An employer wants to know whether staff will wear it all shift. A club wants to know whether members will wear it outside meetings.
Turn those questions into specific checks, such as fit across body types, comfort during movement, how the garment handles washing, and how decoration looks on the fabric. A sample test without a defined goal tends to produce vague opinions.
Order the Right Samples
Do not order one size and assume it represents the range. Where possible, request:
- A core size such as medium, for general assessment.
- A larger and a smaller size, to see how the cut scales.
- The actual colors you plan to buy, since dyes can look different in person.
- A decorated sample, if you plan to add a logo.
Ask whether samples are free, charged, or refundable, and how long they take. Build that time into your schedule.
See also: Creating a Lifestyle That Feels Balanced and Meaningful
Run a Structured Fit Session
Gather a small group that reflects the people who will wear the garments. Include different heights, builds, and ages. Give each person a short checklist and ask them to move, not just stand.
- Raise both arms overhead.
- Reach forward as if lifting or typing.
- Sit and stand while wearing it.
- Check that cuffs, hems, and collars stay comfortable.
- Wear it over the layers they would normally put underneath.
Record comments and photograph each person. Patterns show up quickly: if several people say the sleeves are short, that is a finding, not a preference.
Test the Soft Layers
Mid-weight layers are often the garments people wear most, so they deserve careful testing. When evaluating a soft layer such as Fleece Jackets, pay attention to how the fabric feels against the skin, whether it pills or sheds after washing, and how it sits under an outer layer. Compare the measured garment against the supplier’s size chart, and ask for fabric and care details in writing so you can describe the product accurately later.
Test the Warm Layers
Heavier outerwear raises different questions: how it moves, how it packs, and how it behaves over several layers. Buyers planning large orders often compare a wholesale insulated jacket sample against alternatives, checking seams, closures, pocket placement, and general construction. Confirm minimum quantities, lead times, and size availability while you are at it, because a great sample is of little use if the supplier cannot deliver the size range you need.
Wash and Wear Trials
A garment can look perfect new and fall apart after three washes. Test for it.
- Wash a sample according to the care label, several times if possible.
- Check for shrinkage by measuring before and after.
- Look for color change, fading, or bleeding.
- Inspect seams and stitching for loosening.
- Examine the decoration, if any, for cracking or lifting.
Then have a few people wear the garment in real conditions for a week or two. Real use reveals problems that a fit session cannot, such as a collar that rubs after hours or a pocket that is too shallow.
Score and Compare
If you are testing more than one supplier, use a simple scoring sheet. Rate each sample on fit, comfort, construction, appearance, washing performance, and decoration quality, then add notes on lead time, price, and responsiveness. A written comparison makes the decision easier to defend and easier to repeat next season.
Document Everything
Keep photographs, measurements, and comments in a shared folder. If the production batch differs from the approved sample, you will have evidence to raise the issue. It also helps the next person who takes over buying.
Approve the Sample Formally
Once you are satisfied, confirm in writing which sample is the reference for production. Ask the supplier to match it, and agree what happens if the delivered garments differ. When the order arrives, compare a few pieces against the reference sample before you distribute or sell anything.
Final Thoughts
Sampling feels slow when you are in a hurry, but it is far cheaper than fixing a bad order. Define what you need to learn, test with real people, wash and wear the garments, and record the results. Buyers who treat samples as evidence rather than a formality end up with products people actually like wearing.